If you’ve got a shed in your garden then you already know how much use, either for practical, storage or leisure reasons, they can be to your home. Well, if you want to maximise the use of your shed, then you’ll want to ensure that you can use it all the year round. Not just when the sun is shining and the temperatures are warm. For this reason, we recommend that you insulate your shed.
So, why not settle in and read our handy guide on how you can make your shed insulated and good for practical use twelve months of the year.
Ensure Your Shed is Dry
Before you can go about insulating the shed, you need to check that it’s in good working order in the first place.
Why not start by giving the shed a full once-over?
Take out all the tools, garden furniture, equipment and other items you have stored in there so that you can get an unobscured view of every nook and cranny. Inspect everywhere: the roof, joints, flooring, windows, doors and supports.
These all represent barriers to the elements of the outside world, and any weaknesses can let in the wind, rain and cold air. So, ensure that they are in good repair.

Roof
Of particular importance is the roof, which can be prone to disrepair and leakage over time. The felt, which provides a weatherproof barrier will deteriorate over time.This is why we recommend regularly inspecting.
While you can repair damaged felt with patching, this is really only a temporary measure, and if you are going to the trouble to fully insulate the shed, it’s worth considering renewing the entire area of the roof. You could opt for alternative roofing materials, such as EDPM rubber membrane, offering a cost-effective and fully waterproof solution.
Timber
If you’ve identified damage or rotting to any of the timber then you need to take action.
This can be particularly prevalent around windows and doors (although you should check everywhere). If you find evidence of rot or damage then remove and repair with good quality wood filler. Sand to a smooth finish.
To keep your timber well-maintained and rot free in the long-term, treat regularly with a good quality wood stain.
Floor
Inspect the floor from corner to corner, giving particular mind to those areas prone to high traffic (such as by the doors and main walkways) as well as areas that have given support to heavy equipment.
You should also pay attention to the floor supports, ensuring they remain level, robust and are not showing any signs of subsidence. This can lead to warps and distortions in the framework, which can create gaps that the weather loves to penetrate.
Apply Draught Exclusion
If you’re shed has started to warp or distort, either through subsidence, age or general wear and tear, then you will find gaps appearing in the frame. Gaps that can lead to wind and cold air coming into the shed.
And, of course, to damp from the rain.
If you do identify gaps of this kind, and it’s highly likely that you will in an older shed, then they can be addressed a number of ways.
- Draughts around windows and doors – squirt expanding foam into the gaps, making sure you remove all the excess when completed.
- Poorly-fitting windows – Apply adhesive rubber draught excluders around the edges to keep the wind from leaking into the interior.
- Gaps under the door – Apply a door brush draught excluder
Insulation Types
When it comes to installing the insulation itself then there are a range of different options available to you to keep the shed sealed and protected from the elements.
Rockwool
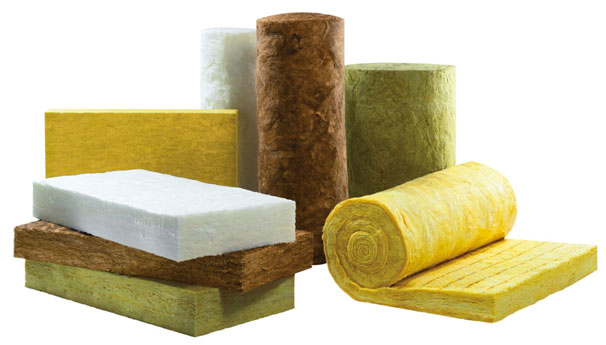
Rockwool is a popular and effective insulator for garden sheds; offering the added bonus of good quality sound insulation.
However, the installation can be an untidy affair, and it can be quite irritating to people with sensitive skin types, causing itchiness and discomfort to the skin and eyes. Therefore, we would urge you to ensure that you wear appropriate personal protective equipment for this task.
PIR Insulation Boards
A fibre-free rigid board made from thermoset polyisocyanurate insulation material, PIR boards are a commonly used insulator by construction professionals.
The boards are foil-backed to a thickness typically between 50 and 150mm and generally designed to ensure it fits to standard spaces in the shed’s timber frame; although the boards are simply fitted to size by cutting and putting into the required space.
Bubble Wrap
This is a pretty cheap and cheerful variant of shed insulation.
It’s certainly easy enough to install, nothing more arduous than cutting to size and stapling to roof and walls.
There are a few types of bubble wrap available, with the more high-tech version being the foil-backed wrap, which provides an extra layer of insulation. However, the reality is that, even with the foil backing, bubble wrap offers only the most basic level of insulation for both heat retention and sound.
You may save money by going down this route, but it’s highly likely you’ll be disappointed with the outcome.
Wool
With good quality sound and heat insulation properties, wool provides an effective and environmentally friendly option.
Specific wool insulation materials, such as Thermafleece, is also a safe to use and relatively easy to install insulator; cutting to the size you need and installing as you would rockwool.
Installing the Insulation
Once you have settled upon the material you want to proceed with, the next step is to actually carry out the installation.
The insulation is fitted into the spaces between the timber framework of the shed, as well as, optionally, into the roof and floors.
Before applying the material, you should install a damp-proof, breathable membrane to the inner side of your shed’s cladding, following manufacturer’s instructions. Once in place, you are ready to install the insulation material, fitting to ensure a snug fit, and again, following manufacturer’s guidelines.
Install Boards or Inner Panels
Having installed the membrane and insulation materials, you can now proceed to install the inner panels of the shed for the final piece of the puzzle.
Again, you have a number of options to consider, including:
- Plywood – A tough and pretty durable material, plywood comes in a range of thicknesses, typically between 9 – 9 mm. It’s a cost-effective and popular choice for sheds, and generally fit for purpose for general, everyday use.
- Plasterboard – An inexpensive option if you are on a budget, it’s a relatively effective cover for the inner walls. However, plasterboard is not a very robust or durable, making it prone to damage when moving heavy items such as a garden table or lawnmower.
- Tongue & Groove – While this is more complicated in the installation, its toughness and versatility means that, with a bit of paint, you can have a really warm, long-lasting and attractive interior. It’s unlikely that most sheds will require this level of aesthetic homeliness, but could be ideal if converting the shed into a leisure den.
- Hardboard – Another cost-effective option, albeit offering a more robust solution to plasterboard, Cheap to purchase and easy to install it can be an effective covering for the interior of your shed. However, be aware, it offers little water-resistance, so if your waterproofing fails it can become quickly damaged.
Conclusion
And that’s it. Your shed is nicely insulated against the elements and set up for use throughout the year, come rain, wind, hail or sunshine.
The question remaining, being: what are you going to use this new multifunctional, well-insulated for?
Featured image credit: By FMI / Wikimedia Commons


